Online:Ashalmawia
< Elder Scrolls Online: Places: Vvardenfell / Daedric Ruins / Delves(Redirected from Online:Ashalmawia Explorer)
|
||||
|---|---|---|---|---|
| Delve | ||||
| Discoverable | Yes | |||
| Completion | Explore and Clear | |||
| Dungeon | Yes | |||
| # of Zones | 1 | |||
| Skyshards | 1 | |||
| Occupants | ||||
| Outside:Worm Cult Assassin, Worm Cult Battlemage, Worm Cult Dreadmage, Worm Cult Reverent, Watcher Inside:Zylara Clannfear, Daedroth, Dremora Hunterkyn, Dremora Kynlurker, Dremora Shadowkyn, Harvester, Hunger, Ogrim, Scamp, Spider Daedra, Worm Cult Assassin, Worm Cult Battlemage, Worm Cult Dreadmage, Worm Cult Necromancer, Worm Cult Reverent |
||||
| Zone | ||||
| West Gash, Vvardenfell | ||||
| Location | ||||
| Northeast of Gnisis | ||||
| Loading Screen | ||||
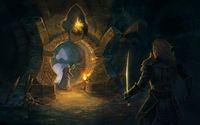
"Among the ancient ancestral spirits who accompanied Saint Veloth and the Chimer into the promised land of Morrowind, the four Daedra Lords, Malacath, Mehrunes Dagon, Molag Bal, and Sheogorath, are known as the Four Corners of the House of Troubles."
|
||||
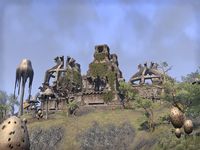
Ashalmawia is a delve and shrine to Molag Bal found in the West Gash region of Vvardenfell, northeast of Gnisis, containing Worm cultists and Daedra.
Galur Rithari, a Dunmer vampire and former Buoyant Armiger, can be found in the sunken vaults, feeding on the Worm cultists. Cultists are performing rituals in multiple locations throughout the ruins, which will summon additional Daedra to attack you. Ash Hoppers, Fetcherflies and Shroom Beetles are found in numbers within. Fiendroth are found outside.
It sits atop a hill east of the Ald Velothi Harbor House and southwest of the Urshilaku Camp Wayshrine.
Related QuestsEdit
- At Any Cost: Take steps to help Mistress Dratha beat death.
- Daedric Disruptions: Prevent Worm Cultists from completing their Daedra summoning rituals.
- Relics of Ashalmawia: Help recover historical relics from a Daedric ruin.
Clearing the DungeonEdit
- Explore and clear Ashalmawia.
To clear this dungeon and mark it as complete, you need to kill the following bosses:
LayoutEdit
ExteriorEdit
Three cultists (a reverent, a dreadmage and a battlemage) are performing a ritual at the northernmost structure. If you kill them, two clannfear will emerge. A watcher will appear after the clannfear have been disposed of. If you head south from here, you'll find a battlemage sitting by a campfire near a backpack. A chest can spawn by the wall east of the campfire. Two cultists (a reverent and a battlemage) are mulling about west of the campfire, and an assassin patrols up the stone stairs northeast of the campfire. Another assassin looks over the landscape at the eastern end of this walkway. You'll find one of the relic dig sites for the Ashlander quests behind this cultist. The entrance to Ashalmawia is just down the walkway heading south.
Ashalmawia ShrineEdit
You'll find a shroom beetle and a backpack in the short hallway you find yourself in upon entering the delve. ash hoppers and fetcherflies can be seen throughout the ruin. You can loot on urn on the right-hand side of the longer stretch ahead of you, which leads into the delve's first proper chamber.
Here, a Worm Cult Dreadmage and battlemage kneel before a defaced statue of Molag Bal. The statue's entire upper half has been removed from the installation. His arms have been cast off to the side, and his head is sitting at the base of the statue. The cultists have candles in the head's mouth, and its eyes are glowing blue. You can loot the urn located near the statue's head.
If you head west, you'll enter a hallway that leads to the lower level of the sunken vaults. Heading east brings you to the upper level.
The walkthroughs for the Sunken Vaults will assume you're entering from the eastern hallway.
Western HallwayEdit
You'll find a necromancer and an assassin at the base of the stairs. An urn is located off to the south. You'll find a battlemage praying before a banner and many candles in the southern alcove, near a backpack, two sacks, an urn, and three bedrolls. A battlemage stands guard at the western corner of the hallway. A Worm Cult reverent walks up and down the stairs, while a necromancer and an assassin stand silently at the next landing. A scamp is standing in the middle of the staircase leading to the Sunken Vaults.
Eastern HallwayEdit
A Worm Cult Assassin is sharpening a dagger in front of a rack holding several pickaxes. The short hall leads into tunnels that have been dug into the side of the stone wall. A necromancer inspects crates and baskets in the tunnel ahead, while an assassin patrols further in. A dreadmage and a reverent stand in a clearing where natural light is filtering in from above. If you head east from their location, you'll enter the Sunken Vaults. If you head west, you'll come upon a small room containing a backpack. Zylara is located in this room, kneeling before the Stone of Ashalmawia. There are a few baskets and barrels to loot in here.
Sunken Vaults, Upper LevelEdit
When you enter the vault, you'll find yourself at the base of a pavilion where a necromancer is kneeling near two summoned clannfear. The cultist is summoning more Daedra. The abundance of bones (and the two corpses that still have flesh, which the clannfear are devouring) indicate that the clannfear are well-fed. If you kill these three enemies, two scamps will appear. A hunger will spawn once the scamps have been disposed of. If you head east from the ritual site and cross the wooden bridge to another structure, you'll find Galur Rithari looking over the ruin, the corpse of his last meal slumped over nearby. His journal is sitting on top of a nearby crate.
If you head south from the ritual site, you'll descend further into the vaults. A scamp, an assassin and a dreadmage lie at the base of the first set of stairs. Two more scamps are further down the next set of stairs, and a battlemage is reading a book near the bridge heading forward. The cultists appear to have bitten off more than they can chew with the daedroth that stands on the pavilion ahead. Stacks of books and scattered papers abound on this structure, and a circle of candles indicates a ritual was performed here. There are three dead worm cultists here.
You'll descend further into the vaults by crossing a bridge to the northwest. If you stand in the middle of the bridge and face the waterfall to the northeast, you may find that a chest has spawned. You can access this chest by heading back towards the daedroth's pavilion and standing on the rocky outcropping east of the pavilion. You can maneuver your way down to the ledge where the chest is located from there.
You'll find another ritual site northwest of the daedroth pavilion. There are many cages here. A Worm Cult Reverent and dreadmage are kneeling before a Dremora Kynlurker. Another kynlurker and a hunterkyn spawn if you kill these three enemies, and a harvester appears once these are taken down. Once you take the bridge down southwest from here, you'll find yourself in the lower level.
Sunken Vaults, Lower LevelEdit
Heading southwest, you'll come upon an empty platform. The real point of interest lies up the stairs on the pavilion to the west: the delve's boss, a Daedric Titan named Phobbiicus. Phobbiicus is guarding a rather large pile of soul gems. You'll find a barrel and a sack behind him.
A staircase on the east side of the empty platform leads you to the very bottom of the sunken vaults. A pair of ogrim stand guard at the base of the stairs. A daedroth is wallowing in the shallows south of the stairs. He is laying very still. Another daedroth is standing at the base of the waterfall to the north. A Worm Cult Necromancer and reverent loiter in the shallows below the bridge, to the northwest. A green ogrim walks back and forth between them and another section of the underground lake, and a clannfear is sleeping in the grass west of the pair. On the other side of the bridge, an assassin is relaxing on the shore. A dreadmage is drinking water from the lake nearby.
The next hallway lies through a tunnel along the southern wall. An assassin, a necromancer and a reverent inhabit the first section of the tunnel. Once inside, you can turn right and head straight for the door that leads you back into the shrine proper, or you can continue moving south and head for the southernmost portion of the ruin.
If you head south, you'll find yourself in a temple hallway. A clannfear patrols the tunnel leading up into the ruin, and two cultists stand guard at the end of the tunnel. Another cultist is standing silently just off to the right as you exit the tunnel. Straight ahead of the tunnel's exit is an alcove where a necromancer is praying. A chest can spawn by the right wall. Additionally, there is a backpack, an urn and a bedroll nearby. The delve's skyshard lies in the room at the southern end of the hallway. Large stacks of books are scattered here and there, and there are two bookshelves leaning against the western wall. A battlemage, a dreadmage and a reverent perform a summoning ritual in the center of the room. If you kill them, a Dremora Kynlurker and Shadowkyn appear. A Spider Daedra spawns upon their defeat.
Two more cultists wander the northern portion of the hallway. There are two more alcoves on the east and west sides of the hall. The eastern alcove contains a barrel and an urn, while the western room contains a backpack and an urn. The door leading back up to the shrine lies to your left once you reach the northern end of the hall. If you instead opt to head east, you'll find a cultist worshipping Molag Bal at an altar inside the tunnel that leads you back into the sunken vaults.
BooksEdit
- Ongoing Journal of Galur Rithari by Galur Rithari — An armigers's journal about his struggle with vampirism
AchievementsEdit
There are two achievements associated with this location:
| Achievement | Points | Description | |
|---|---|---|---|
| Ashalmawia Explorer | 5 | Explore and clear Ashalmawia. | |
| Daedric Explorer | 10 | Visit all of the Daedric ruins in Vvardenfell. | |

